Advanced BI Publisher Techniques – Guidance for Practical Applications in JD Edwards
To ensure your BI Publisher practices are optimal, you’ll need to understand the capabilities of this innovative tool. In this article, we’ll cover some advanced BI Publisher techniques through practical uses and functionalities in JD Edwards.
Skip to the information you’re looking for!
Advanced BI Publisher Techniques
During one of our JD Edwards Upgrade projects, we got an opportunity to convert JD Edwards’ reports using Formscape to Embedded BI Publisher, which encompassed several challenges. In this blog series I’ll discuss some advance BI Publisher techniques we used to overcome them.
In the end, what we realized is that by using some creative outside-the-box tactics, Embedded BI Publisher can meet all of our requirements. For the benefit of a wider audience I am writing the challenges and the solutions we figured out after extensive research.
You may not have the same requirements, but I hope it helps you to resolve your problems if you have similar challenges. It’s tough to cover everything but I will provide as much detail as possible.
Advanced BI Publisher Technique #1: Check Printing / Sequential Process
If you want to process BI Publisher (BIP) documents in sequential order when bursting feature is enabled, there is no direct way to accomplish this. JD Edwards processes data and notifies BI Publisher kernel when XML file is ready to consume.
If there is a bursting feature enabled, BIP splits the document by the specific data field but BIP doesn’t process the documents sequentially in the order it has received them from JD Edwards. The processing is optimized for performance, so first it will finish processing the documents that have less data. In order to process and route the documents in sequential order which was required in Check Printing, we had to build/customize the process in the following order.
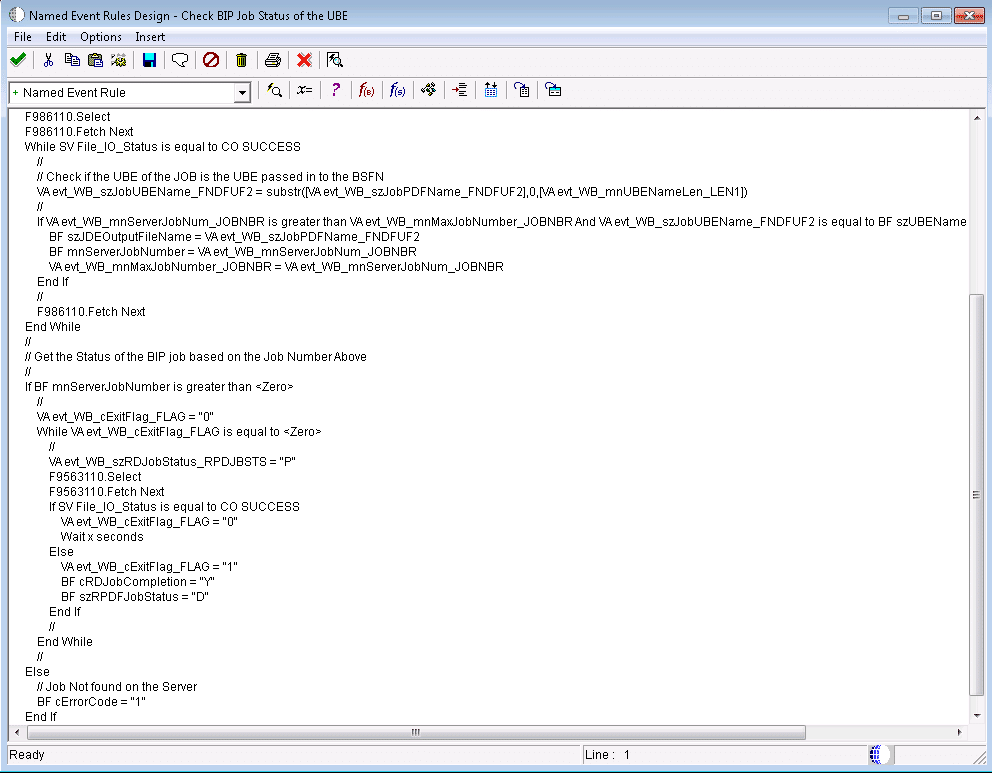
Step #1) Write a BSFN to get the job status of each individual BIP job. It should keep checking the status of the job until it is done.
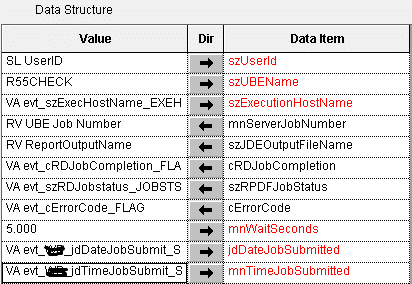
BSFN Code:
Step #2) This process can be used when you want to process and route the documents to the printer sequentially, or see the completed jobs (printed) in sequential order, etc.Build a Driver UBE on the table which contains the bursting information.
Step #3) Create custom Check and Advice Printing UBE’s.
Step #4) Submit a UBE (Check or Advice) from Driver UBE for each burst field (grouping) one after another. For example Area 1, Area 2 etc.
Step #5) Setup default printer for R07230 and all custom UBEs thru P98616 Application.
Advanced BI Publisher Technique #2: Specify Specific Printer Trays for Specific Outputs
In order to route the finished outputs of BI Publisher to a specific tray of the printer, there is no direct solution provided in JD Edwards / BI Publisher. For example, in case of AP Check process, if you would like to route checks to tray 4 of the printer (this tray may have the pre-printed check paper) and route remittance details to tray 2 of the printer containing plan paper, you can accomplish this functionality through the following steps. Our client wanted to use the check stock paper for checks and plain legal for details.
Using the Microsoft Word add-in for BI Publisher there is a feature that provides a way to set this up, but BI Publisher doesn’t honor tray settings done in Word when using Embedded BI Publisher with JD Edwards. Here are the steps to achieve this functionality:
Step #1) Get the ppd file of the post script printer you want to print through the documents and modify the file to change the sequence of the printer. Make multiple files for each tray. Create one file for checks with tray 4 as first tray in the sequencing and another with tray 2 as first tray in the sequencing. Here is the example for tray 4.
Step #2) Create a folder ‘PPD’ in the resource folder on Enterprise Server and save the both files.
Step #3) Define logical printers in JDE. Use alias name of the same printer to define multiple printers of one printer. For example,\PrintServer1APCheckprinter
\PrintServer2APCheckprinter
PrinterServer2 is the alias name of the PrintServer1.
Step #4) When adding the first one for tray 4 selection, add the APCHKT4.PPD file in the printer model.
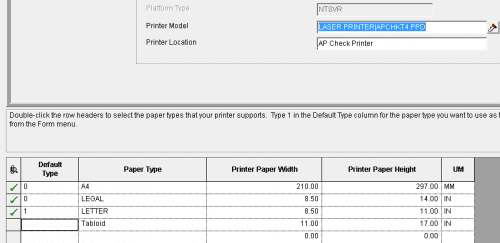
Step #5) When adding the first one for tray 2 selection, add the APCHKT2.PPD file in the printer model.
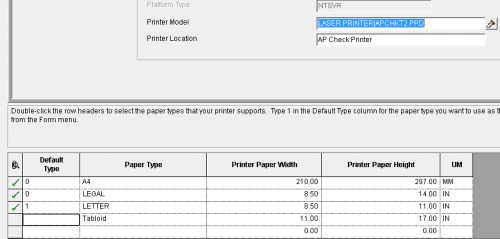
Step #6) Setup the printers for AP Check programs (R04572, R04573 etc.) to use specific tray of the printer.
By assigning the UBEs to the printers and using PPD files for each printer to assign the tray printing priority you can control how any of your reports print and which tray they draw paper from for printing.
Advanced BI Publisher Technique #3: Email Routing
BI Publisher email routing might be simple in Embedded BI Publisher but customizing the routing may be a little bit tricky. We had a variety of requirements at one of our clients in distributing the finished outputs. The client wanted the report distribution based on the value chosen in the report processing options. Here are the details of the requirement.
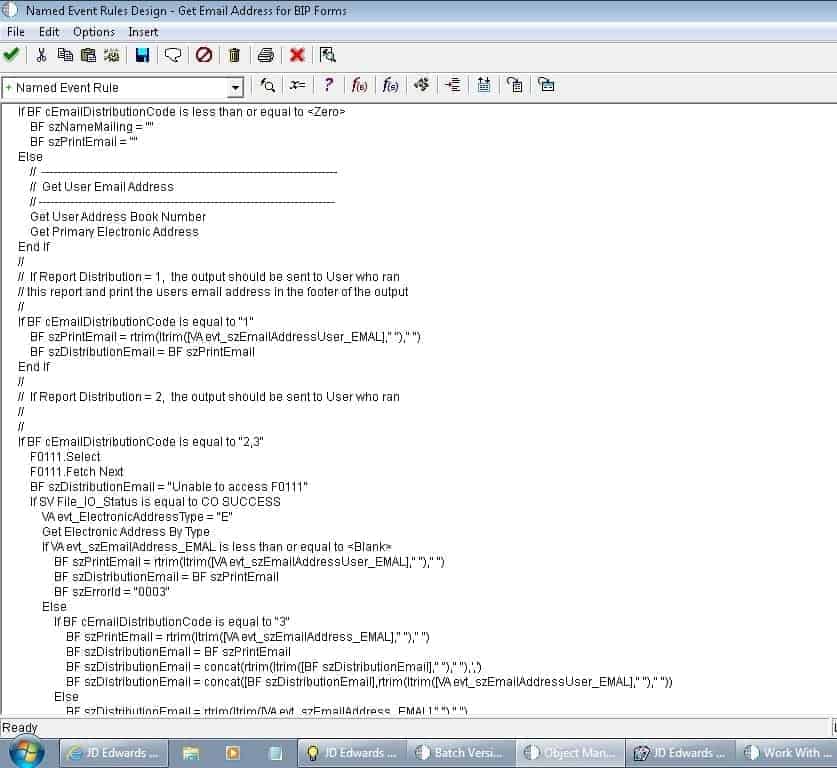
In order to achieve this, we have built a custom business function (NER) to construct the email addresses based on the option chosen in the processing options and used BSFN in the report to have it included in the XML file.
In this way, we avoided hard coding and provided flexibility to the users to choose one of the different processing options. The following screenshot depicts the sample code of the custom business function which constructs the email addresses. This is simple JD Edwards code.
The main advantage of this code is reusability. You can save lot of time by using it in all BIP programs (write once use many). Our client is using this in almost all their BIP programs and never had any issues in distributing reports.
Advanced BI Publisher Technique #4: Printing Dynamic Watermarks
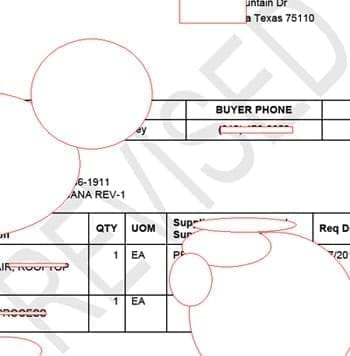
Watermarking documents is a useful and common feature. BI Publisher watermarks allow for basic static types, but changing the watermark text dynamically requires a little more work. There are various reasons you may want to have a watermark changed for different versions of the same report. For example, the watermark can be used to identify duplicate documents (re-prints) or mark the draft version of a document.
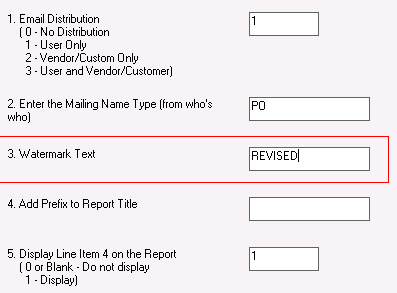
Our client wanted to control the watermark text which will be printed on the reports and support dynamic text changes to the watermark.
When we reviewed all requirements of BI Publisher watermark, we came up with a processing option template (tab) for the watermark text that we could create and re-use. Instead of building the same logic in several programs, we attached this tab to all JDE programs (BIP) that required dynamic watermarks. The tab allows the user to enter the watermark text, or graphic as a processing option prior to running the UBE.
The advantage of this methodology is the user will be able to review and choose the options and change the values dynamically. To avoid hard coding, we used the following XML tag in the custom watermark of the word template to achieve this functionality.
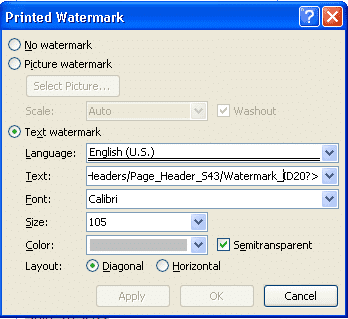
We just have to find the tag (processing option field) and add it custom watermark field on the Microsoft Word template. This is how it works.
Step #1) User runs the program and adds/modifies the watermark text in the processing options dynamically.
Step #2) Watermark text is stored as a variable within the XML file.

Step #3) When BIP lays out the data onto the template, it will replace the tag with a value.
Advanced BI Publisher Technique #5: Multiple Pick Slips
As you aware, when Report Definition (RD) is associated to a JD Edwards report, JDE provides data in form of XML format based on the logic exists in the report, and notifies BIP kernel that the XML file is ready to process. BI Publisher reads XML file and lays out the data on the template based on the Report Definition (RD)… but data (XML) needs to be in structured format.
In case of ‘Print Pick Slips’ (R42520), JD Edwards report doesn’t provide the XML file in a structured format – which is required to design the BIP template to be able to print multiple pick slips at a time. Usually detail lines will be associated to header but in this program it is in the other way.
If you take a look at this XML file, header section is included in the detail section. At one of our clients, users had to run the program for just one pick slip at a time. It is a cumbersome process. You can imagine how difficult it would be when you are asked to print the pick slips one at a time.

After thorough review of the report and XML file, we could find the solution to overcome this problem. Here are the steps we took to print multiple pick slips at a time.
Step #1) Create custom UBE and add the pick slip number in the detail section so that it will be included in the details section of XML section.

After thorough review of the report and XML file, we could find the solution to overcome this problem. Here are the steps we took to print multiple pick slip
Step #2) Write the following code in Microsoft Word template (Pick Slip Template). This is just a sorting by ascending order. Since the detail section has the pick slip number, BIP builds the structured XML by sorting and you will be able to print many slips at a single time.
By creating a custom UBE, and structuring the BI Publisher template, we implemented a much more efficient way to print pick slips. You can use a similar technique on other UBE reports that print one document instead of multiple documents per run.
Advanced BI Publisher Technique #6: Performance – Print Large Volume of Checks
We know performance is one of the biggest challenges in any program or system. When we got an opportunity to convert Formscape Paycheck Advices to BI Publisher PaycheckAdvices, it was a big concern because our client usually prints 20,000+ paychecks each week. We have customized the payroll check process to meet the following requirements. But there are certain limitations of the BI Publisher.
The check/advice printing process via Formscape was taking approximately 5 hours to print 20,000+ checks. We knew if we were to successfully convert to BI Publisher, we needed to meet or improve upon this performance.
In addition, in order to enable the sorting/sequencing for the printing we had to create a custom business function to process/print the documents in sequential order as we discussed in our first blog in this series (Enforcing sequential printing).
Wrapping Up – Finding the Solution
In order to improve performance, we maximized printer throughput by pooling multiple printers. Using Microsoft Windows printer pooling feature, we defined a single printer with multiple IP ports that route to multiple printers. When BI Publisher routes finished documents to the printer, this feature takes care of distributing the documents to multiple printers equally.
We have installed the printers, printer1 and printer2, on server server1 and enabled the printer pooling. The printer pooling feature distributes the jobs to both printers one after another. Here is the sample screenshot of the printer pooling.
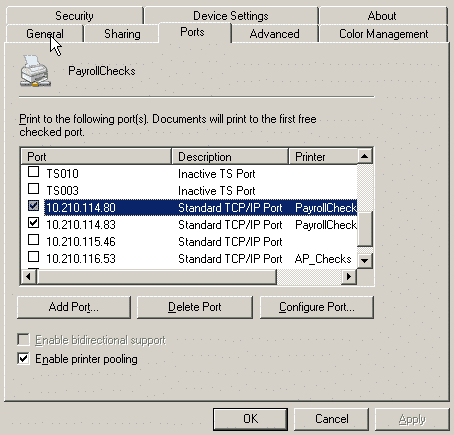
By leveraging printer pooling, we improved the throughput performance to meet the customer’s needs. We also noticed that the custom business function we used to enforce sequential process by Area did not have a significant impact to the overall payroll processing performance.
Looking for more on JD Edwards?
Explore more insights and expertise at smartbridge.com/jdedwards
Keep Reading: 10 Steps to Designing an Excel Template for BI Publisher
There’s more to explore at Smartbridge.com!
Sign up to be notified when we publish articles, news, videos and more!
Other ways to
follow us: