JDE E1 Security Best Practices: Tips for Oracle JD Edwards EnterpriseOne
Part 1: JDE E1 Security Best Practices – Function-Based Roles
JD Edwards E1 Security has advanced to the point that we need to revisit our security settings. Due to earlier releases of Oracle JD Edwards (JDE), we were limited in our options for setting up Roles and Groups. I don’t think any of us likes to redesign security – I know I don’t. However, now that a User ID can have up to 30 Roles assigned to them, we have expanded horizons which necessitates a redesign to stay current with enforceable Best Practices.
Roles Best Practices
This takes a new way of looking at Roles. Rather than assigning Roles to a job description, we must look at the functions or tasks that a job description requires. Some people call these “process-based” Roles but I tend think of a process as something like “Order to Cash” which is comprised of many different functions.
For example, the job description for an Accounts Payable Clerk might contain the following list of duties:
- Standard
- Logged
- Matched
- Prepares Cash Requirements
- Seeks Approval from Controller when Checks are ready to print (Provides documents to support Vendor Payment and Disburses Checks)
- Prepares 1099
User Tasks as Business Functions
Previously, we made Roles that matched the job description – e.g., the Accounts Payable Clerk was set up with the Role APCLERK and specific menus were designed for APCLERK. The job description remains the same for an Accounts Payable Clerk.
Best Practices now call for the functions to be defined as the Roles like this:
| User Task = “Business Function” | Role |
|---|---|
| Maintains Vendors | VNDMAINT |
| Enters Vouchers | VCHMAINT |
| Completes Check Printing | CHKPREP |
| Prepares 1099 | 1099PREP |
These could be broken down further into STDVOUCH, 2WAYVOUCH, 3WAYVOUCH or CSHREQUIRE, CREATEPYMT – if that was how the organization is structured. For Segregation of Duties requirements, you may also want to narrow the scope of Vendor maintenance to allow APCLERK only rights to change a Vendor (not add a new one), and turn on Address Book Approvals while some other department or person has only the rights to add a new Vendor.
Because of my background, I think of these like business functions; only one function is completed for each Role. A business function is a task, or a part of a task. If you told your child to go to the store and get a loaf of bread, your child would know that they were to return upon the procuring and paying for the bread. Unlike your child, a computer must be told every step. So, the list of business functions, tasks, for a computer would be as follows:
Even though we went through the exercise of changing the Users’ Roles, we didn’t see any need to change the menus. All of the functions and Roles that were assigned to APCLERK were on the same menus. If a User ID were to change Roles, we might potentially have to change menus but we didn’t have that need.
In the next post, I’ll explain how to assign Business Units in JDE according to best practices, complete with examples.
Part 2: JDE E1 Security Best Practices – Business Unit Security
JDE Business Unit Security has always been widely used in many different ways. In some companies I’ve seen it connected to the company Address Book by using the Business Unit there to enforce access for the User. Unfortunately, that limits you to one Business Unit–which is fine if the Business Unit is associated with a Company and that’s the lowest denominator for your organizational structure. What do you do when your lowest denominator is Department?
Of course, you can assign Business Units to the User ID. That’s one reliable way of way of accomplishing the requirement but certainly not Best Practices. Best Practices dictate that, as much as humanly possible, you want to avoid assigning security to a User ID. Assignments by Role should be the rule.
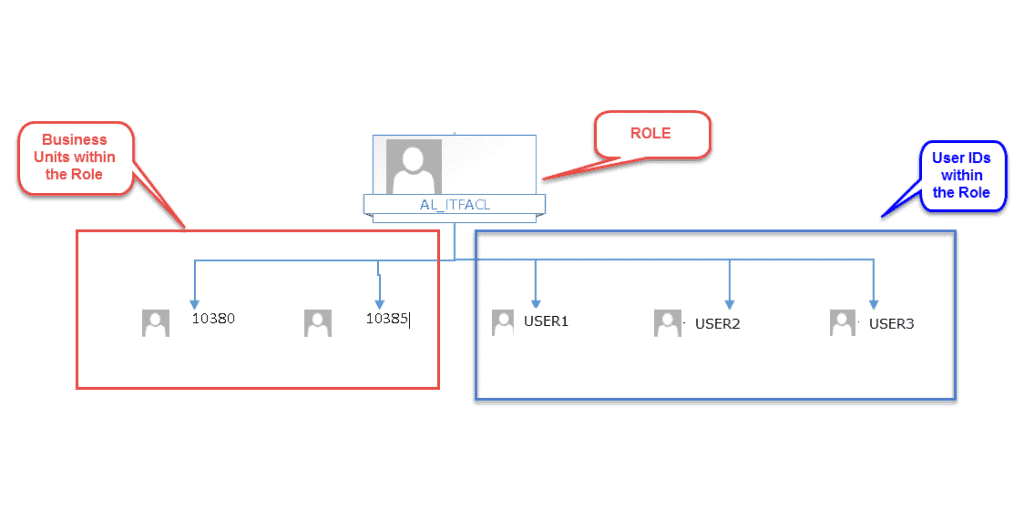
You can design your Business Unit Security to the Role level. Let’s take a look at the organizational structure below:

As you can see, we have three User IDs that need access to two separate Departments: 10380 and 10385. These three User IDs handle the budgeting to and reporting of costs to the two Departments. If USER3 were to leave the organization, the Role is still intact and can be changed when the replacement of USER3 arrives.
If USER3 changes departments, just change their Role Relationships. No need to go in and change the User Security.
(Hint: Use the Organizational Structure Inquiry/Revisions, P0050, to help you build your organizational structure diagram, get the way that accurately reflects your organization and then construct your Business Unit Security using that framework.)
This same methodology can be used for all types of Row Security. We also used it to limit access to certain Object Accounts. In the above example, USER2 and USER3 are at the executive level. They need to see the information for all General Ledger Accounts within both Departments. USER1 is at the administrative level and should be restricted from seeing Accounts that contain Salary and Wage information – this is particularly true in very small departments (three people) where a little math could divine the salaries of your co-workers, at least in total.
The Role, AL_EXCLS_W, has the following exclusions:

As you can see from a partial listing of the Chart of Accounts shown below, the only Account that USER1 with the Role AL_EXCLS_W has assigned to them is the S & W (Salaries and Wages) for Temporary Clerical workers. They need this type of access to verify the charges on the incoming Invoices from the temp agencies.

With standard JDE, you can only go one level. When using ALL Out Security, you can build hierarchical levels.
In my next post, I’ll be discussing the uses of Super Roles.
Part 1: JDE E1 Security Best Practices – Super Roles
What are Super Roles? How do I get them? What do they do for me?
Super Roles are a feature that ALL Out Security provides with their software package that allows you to build a hierarchical structure of Roles within Roles, so to speak. Below we have Figures 1 and 2. Figure One is a diagram of a hierarchical structure that is layered on top of the diagram that we showed in the Business Unit Security post:
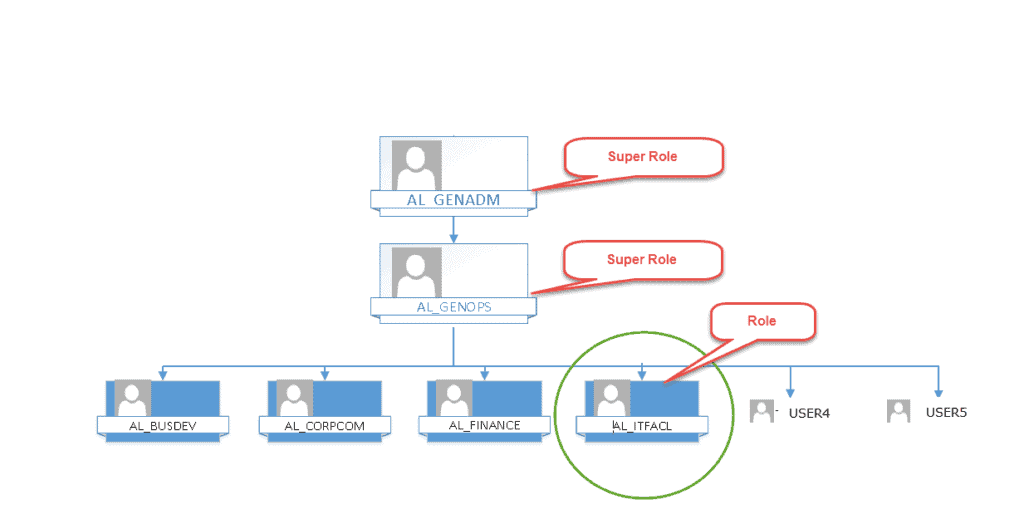
In Figure One the Role for the General Administration Department, AL_GENADM, is the Super Role as is the Role for General Operations, AL_GENOPS. Both of these Super Roles will contain any Business Unit Security Access that is defined in any of the Roles included in the Super Role.
This means that AL_GENOPS will now provide access for USER4 and USER5 to all of the Business Units that have been assigned to AL_BUSDEV, AL_CORPCOM, and AL_FINANCE–in addition to 10380 and 10385 from AL_ITFACL. USER1, USER2, and USER3 are still limited to 10380 and 10385.
Once you have the theory of the structure down, you can begin building these from the bottom up in ALL Out Security using the Super Role to Role Relationship application that looks and works just like standard Role Relationships with another process built in to make it all hang together.
In the table below, we have the Roles and the Business Units assigned to those Roles:
| Role | Business Units | Super Role | Build Sequence |
|---|---|---|---|
| AL_BUSDEV | 10430 | 1 | |
| AL_CORPCOM | 10520, 10720 | 2 | |
| AL_FINANCE | 10350 | 3 | |
| AL_ITFACL | 10380, 10385 | 4 | |
| AL_GENOPS | 10730 | 10430, 10520, 10720, 10350, 10380, 10385, 10730 | 5 |
| AL_GENADM | 10940 | 10430, 10520, 10720, 10350, 10380, 10385, 10730, 10940 | 6 |
The Fix/Merge Process
This process is called the Fix/Merge. What it does in the background is set up the Row Security records in F00950 so that you don’t have to. So, the result for each of the Super Roles is the Business Units defined in the table in the column Super Role.
Could you do this yourself without ALL Out? Of course you could if you spent sufficient time planning it out–which needs to be done regardless of the tool–then executing it. What ALL Out also provides is a way to wipe it all out and start over. With the change of settings in the Fix/Merge, it will wipe out all of the records written in F00950 for the Super Role definitions and will rebuild them based on the newly defined configuration.
Let’s say that AL_ITFACL no longer reported to AL_GENOPS. You would go into the Role/Super Role Relationship application and remove AL_ITFACL from the list of Roles for AL_GENOPS and rebuild the Super Role. There are a couple of tricks to this though. The Business Unit 10730 that was assigned to AL_GENOPS manually will also be gone and need to be re-added. Then you must go through the same steps for AL_GENADM. Again, this could be done manually by a sufficiently-trained and dedicated Security Officer.
I also recommend that you build and/or rebuild your Super Roles from the bottom up. In that way, the Super Roles will contain all of the Business Units in the Roles beneath them without constantly rebuilding your Super Roles. The same rule pertains to any additional Business Units that you might add to the Roles. Let’s say that AL_BUSDEV gets an additional Business Unit, 10830. The Fix/Merge must be re-run for AL_BUSDEV, then AL_GENOPS, and lastly, AL_GENADM.
There’s more to explore at Smartbridge.com!
Sign up to be notified when we publish articles, news, videos and more!
Other ways to
follow us: